Implementing User Authentication with Auth0 in React

Let’s check out how Auth0 can help with User Authentication when it comes to Web Applications built with React and how it’s better in comparison to market competitors.
What is Auth0?
Auth0 is an easy-to-implement, adaptable authentication and authorization platform. In short, it is a highly customizable platform that provides authentication and authorization as a service that can help in securing your application with tools that offer seamless integration.
Using Auth0 for authentication with client-side apps means that Auth0 is going to be responsible for issuing an access token after the user’s identity has been verified. There are several ways to verify a user’s identity, out of those, two common authentication mechanisms found abundantly today are via credentials given by the user (the traditional email or username combination with a password) or through a social identity provider.
Find out more about Auth0, here.
Why Auth0?
- Single Sign-On with support for over 40 different Identity Providers. SSO allows users to simply log in once and use all applications they have been granted access to. You could use your Google account to authenticate yourself with an application that decided to delegate the responsibility to create, maintain, and protect your username and password to Google.

- Universal Login, which significantly improves user experience while boosting security and consistency. Since authentication takes place on the same domain as the login, credentials are not sent across origins, increasing security and protecting against phishing and bucket brigade attacks, also known as man-in-the-middle (MITM) attacks.
- Multi-Factor Authentication provides an additional layer of security, decreasing the likelihood of unauthorized access.
- Anamoly Detection detects anomalies and stops malicious attempts to access your application. Auth0 offers two different kinds of shields, Brute-force protection and breached password detection.
If you want to read about these features in detail, head over to this link.
Setting up the React App
In a terminal window, execute the following commands:
npx create-react-app auth0-authentication
cd auth0-authentication
npm i react-router react-router-dom
The first command will create a new React app for you while the second one navigates you into the directory. The two libraries that we installed in the third command will handle the navigation of our app. Run npm startto see what the app looks like before we make any changes. The command will start a development server that listens at port 3000 and will open the new app in your default web browser.

Now let’s update the index.js file. Simply add the following code snippet to the file:
import { BrowserRouter } from 'react-router-dom';
ReactDOM.render(
, document.getElementById('root'));
serviceWorker.unregister();
What we did was import BrowserRouter from the react-router-dom library, and encapsulate the App component inside this router. That’s pretty much it for kickstarting React Router.
Getting Started with Auth0
- To integrate Auth0 in our Application, we first need an Auth0 account. To create an account, click here and sign up for free.
- Once you’re done with this, scroll down to find the option that says “
Create Application”.

3. In the modal that follows, add the name of the application and then select Single Page Web Applications as its type.
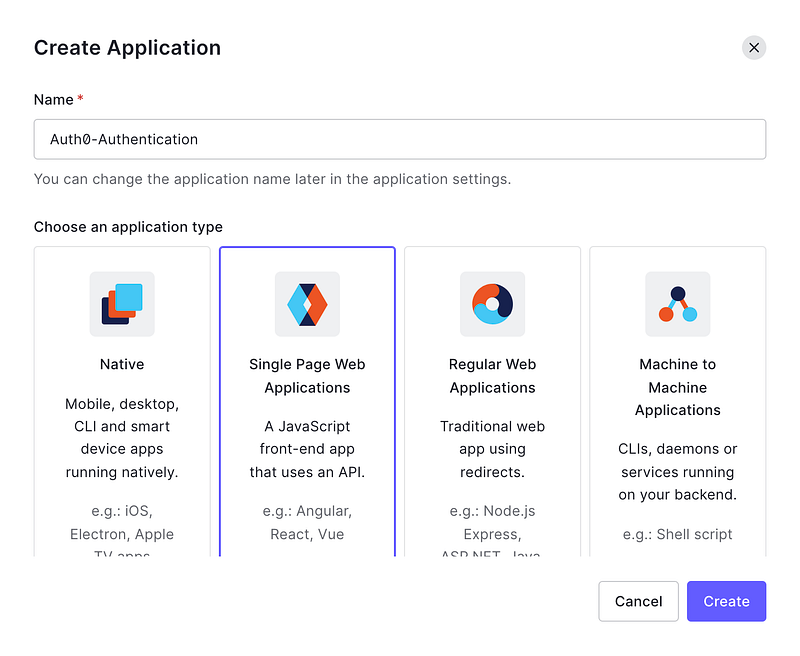
4. Click the Create button which will redirect you to the “Quick start” section.
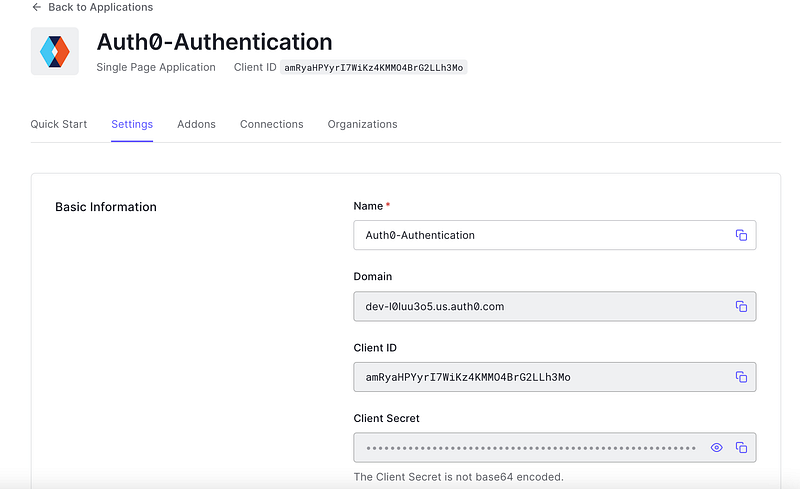
5. Click on the Setting tab to change the configuration of your Auth0 application. We’ll also be borrowing some data from this tab, precisely the Domain, and Client ID.
6. Search for the Allowed Callback URLs field and insert [http://localhost:3000/callback](http://localhost:3000/callback) on it.

While authenticating the app using Auth0, users will be redirected to the Universal Login Page of the app and after the authentication process regardless of being successful or not, they will be redirected back to your application. Auth0 will redirect users only to URLs registered on the Allowed Callback URLs for security reasons.
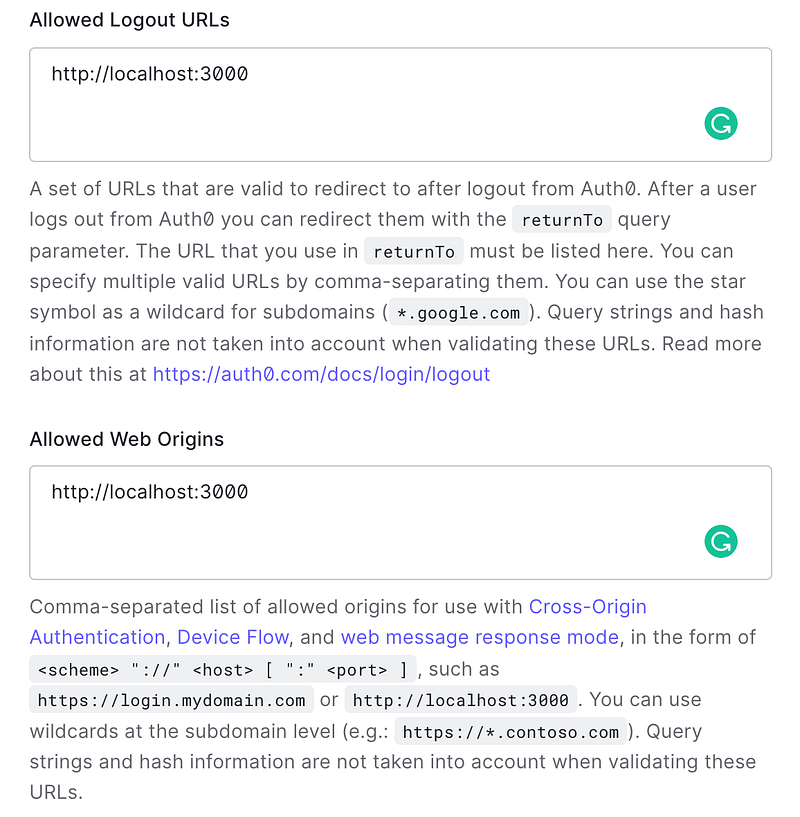
7. Now we need to add Allowed Web Origins and Allowed Logout URLs. As the app is going to issue a request to Auth0, we will need to add http://localhost:3000 to Allowed Web Origins. Without this value, Auth0 would deny any incoming request coming from the app. To enable users to end their session at Auth0, we need to call the Logout URL. Similar to the authorization endpoint which is Allowed Web Origins, in this case, the log-out endpoint only redirects users to whitelisted URLs after the process. Hence, we’ll add http://localhost:3000 here as well.
And that’s pretty much it for setting up things over Auth0.
Integrating Auth0 with the React App
We’ll be using the official Auth0 Library now to integrate and secure the app we just created. Simply return to the terminal and execute the following command.
npm install auth0-js
We’ll now create a class that will store the Auth0 authentication functionality. We simply need to create a new file Auth.js inside the src folder of our react app and add the following lines of code:
As described above, we simply create an instance of auth0.WebAuth with our Auth0 values and define some other important configurations. Do NOT forget to replace the data from Line 7 to 9 with the one in your dashboard to make the app work.
Now to handle the callback route (http://localhost:3000/callback), we’ll define a component, create a new file called Callback.js inside the src directory. Simply add this code to the newly created file:
All this component does is call the handleAuthentication method to fetch the user information that is shared by Auth0. It also redirects users to the home page (history.replace('/')) after finishing the handleAuthentication process. The component also shares a message which reads “Authentication with Auth0 works!” to let you know that you’re on the right path.
Changes in the Front End
To reflect all the changes we made onto our front end, we need to update the App.js file and create a new file Home.js inside src folder. Home.js validates if the user is authenticated or not.
Check out both the files and make amendments.
After making and saving all the changes, execute npm start. Your React app with Auth0 User Authentication is ready.
Ending Notes
The app we just created can be reused for any React+Auth0 App you plan on building. Go through the official documentation of Auth0 to make it better and read about all the other services and tools offered by the Organization. Personally, I prefer Auth0 over Firebase simply because of the Single Sign-On Feature with access to a plethora of Identity Providers.